
Easy Entertaining
Sponsored

I love having friends and family for a cuppa and morning or afternoon tea or a meal. It makes feel good when you loved ones enjoy the food I have made them. I wouldn’t say I was Nigella but I do enjoy cooking and entertaining.
Having guests, friends and family over to your nest should be fun and enjoyable and doesn’t need to be panic-attack-inducing.
The most important thing is to be in the moment and enjoy your company, instead of fretting over how clean your house is or what you are going to serve.
The most important thing is to be in the moment and enjoy your company, instead of fretting over how clean your house is or what you are going to serve.
The most important areas you need to have clean are the entrance way, living area, toilet and bathroom because, obviously, your guests will be using these areas. Adding a ‘for good use’ hand towel on or near the wash basin is a nice touch (and you won’t have people wiping their hands on your bath towels!).

Table Setting:
A lovely way to add style and ambience to the table is a vase or container with flowers in it. It is best to keep the arrangement small, so people can still see each other while conversing. A cheap and easy way is to use a jar, wrap some paper, material, string or ribbon around it and add a small bouquet of flowers to it. Candles always a sophisticate ambiance on a table, I love these tea light holders from Ikea.
 |
| DRÖMLIK Scented candle in pot $7.99 for 2. |
 |
| FLEST Tealight holder $2.49 |
Glasses:
Each place should be set with all the glasses that will be used during dinner (except dessert-wine glasses, which may be brought out when the dessert is served). The water glass belongs to the right of the plate, just above the knife. Wine glasses should be set to the right of the water glasses in the order in which they will be used.
1. Water glass
2. Red-wine glass
3. White-wine glass
4. Champagne flute
5. All-purpose glass
Cutlery:
A proper cutlery setting follows one simple rule, no matter how formal or relaxed the event: Set the cutlery on the table in the order it will be used, from the outside in. The fork for the first course is the one farthest to the left; to the right of the plate, the knife for the first course is the farthest to the right. Any spoons needed before dessert (say, a soupspoon), should be placed to the right of the knives. Dessert utensils should always be placed horizontally above the plate, or they can be brought in later, with the dessert course.
1. Salad fork
2. Dinner fork
3. Dinner knife
4. Soup spoon
5. Teaspoon
6. Butter knife
7. Fish fork
8. Fish knife
9. Dessert fork
Meal planning:
Now this is the tricky part! Ask if your guests have an allergies or dislikes to certain foods and work around that. You can either have nibbles/ hors d’oeuvres to start with or an entrée, then the main meal and afterwards dessert. My family are coming over for my father’s birthday next weekend and I have planned the meal like:
Entrée:
Steak pinwheels with salsa salad
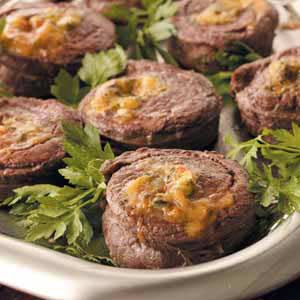
Ingredients:
1-1/2 kgs beef rump steak 1-1/2 teaspoons pepper, divided
1/2 cup shredded cheddar cheese
2 garlic cloves, minced 1/4 cup finely chopped onion
1/4 cup minced fresh parsley 1/4 cup olive oil
2 tablespoons red wine vinegar 2 teaspoons Worcestershire sauce
2 teaspoons Italian seasoning 1-1/2 teaspoons garlic powder
1-1/2 teaspoons salt, divided
Method:
Flatten beef to 1cm thickness. In a large resealable plastic bag, combine the oil, vinegar, Worcestershire sauce, Italian seasoning, garlic powder and 1 teaspoon each salt and pepper; add steak. Seal bag and turn to coat; refrigerate for 8 hours or overnight.
Drain and discard marinade. Combine the cheese, garlic, onion, parsley and remaining salt and pepper; sprinkle over steak to within 2 cms of edges. Roll up jelly-roll style, starting with a long side; tie with kitchen string at 5 cm intervals. Insert a skewer into each piece where it is tied. Cut into 5 cm rolls.
Moisten a paper towel with cooking oil and lightly coat the grill rack. Grill over medium heat for 6-8 minutes on each side until meat reaches desired doneness.
Salsa:
Combine red and yellow cherry tomatoes cut in half (half a punnet of each), a can of corn kernels, tablespoon of chopped parsley, one red onion, a dash of olive oil and a squeeze of lemon juice. Place a serving of salad on the place and set a piece or two of the steak pinwheels on top.
Main:
Jamie Oliver’s Perfect Roast Chicken

This has to be the easiest and most delicious recipe for roast chicken I have used and it does turn out perfectly every time!
Ingredients:
1.6 kg higher-welfare chicken
2 medium onions
2 carrots
2 sticks celery
1 bulb garlic
olive oil
sea salt
freshly ground black pepper
1 lemon
1 small bunch fresh thyme, rosemary, bay or sage, or a mixture
Method:
To prepare your chicken
Take your chicken out of the fridge 30 minutes before it goes into the oven. Preheat your oven to 240°C. There’s no need to peel the vegetables – just give them a wash and roughly chop them. Break the garlic bulb into cloves, leaving them unpeeled.
Pile all the veg and garlic into the middle of a large roasting tray and drizzle with olive oil. Drizzle the chicken with olive oil and season well with salt and pepper, rubbing it all over the bird. Carefully prick the lemon all over, using the tip of a sharp knife (if you have a microwave, you could pop the lemon in these for 40 seconds at this point as this will really bring out the flavour). Put the lemon inside the chicken’s cavity, with the bunch of herbs.
To cook your chicken
Place the chicken on top of the vegetables in the roasting tray and put it into the preheated oven. Turn the heat down immediately to 200°C and cook the chicken for 1 hour and 20 minutes. If you’re doing roast potatoes and veggies, this is the time to crack on with them – get them into the oven for the last 45 minutes of cooking.
Baste the chicken halfway through cooking and if the veg look dry, add a splash of water to the tray to stop them burning. When cooked, take the tray out of the oven and transfer the chicken to a board to rest for 15 minutes or so. Cover it with a layer of tinfoil and a tea towel and put aside. Now is the time to make your gravy.
Dessert
For morning or afternoon tea, dessert or as a birthday cake you simply cannot go past Nigella Lawson’s Old Fashioned Chocolate cake. I have made this cake numerous times and everyone loves it.

Ingredients
For the cake
200 grams plain flour
200 grams caster sugar
1 teaspoon baking powder
½ teaspoon bicarbonate of soda
40 grams best-quality cocoa powder
175 grams soft unsalted butter
2 large eggs
2 teaspoons vanilla extract
150 ml sour cream
For the icing
75 grams unsalted butter
175 grams best quality dark chocolate (broken into small pieces)
300 grams icing sugar
1 tablespoon golden syrup
125 ml sour cream
1 teaspoon vanilla extract
sugar flowers (optional)
Method
Take everything out of the fridge so that all the ingredients can come to room temperature.
Preheat the oven to gas mark 4/180°C/350ºF and line and butter two 20cm / 8 inch sandwich tins with removable bases.
Now all you have to do is put all the cake ingredients – flour, sugar, baking powder and bicarb, cocoa, butter, eggs, vanilla and sour cream – into a food processor and process until you have a smooth, thick batter. If you want to go the long way around, just mix the flour, sugar and leavening agents in a large bowl and beat in the soft butter until you have a combined and creamy mixture. Now whisk together the cocoa, sour cream, vanilla and eggs and beat this into your bowl of mixture.
Divide this batter, using a rubber spatula to help you scrape and spread, into the prepared tins and bake until a cake tester, or a thin skewer, comes out clean, which should be about 35 minutes, but it is wise to start checking at 25. Also, it might make sense to switch the two cakes around in the oven halfway through cooking time.
Remove the cakes, in their tins, to a wire rack and let cool for 10 minutes before turning out of their tins. Don’t worry about any cracks as they will easily be covered by the icing later.
To make this icing, melt the butter and chocolate in a good-sized bowl either in the microwave or suspended over a pan of simmering water. Go slowly either way: you don’t want any burning or seizing.
While the chocolate and butter are cooling a little, sieve the icing sugar into another bowl. Or, easier still, put the icing sugar into the food processor and blitz. This is by far and away the least tedious way of removing lumps.
Add the golden syrup to the cooled chocolate mixture, followed by the sour cream and vanilla and then when all this is combined whisk in the sieved icing sugar. Or just pour this mixture down the funnel of the food processor on to the icing sugar, with the motor running.
When you’ve done, you may need to add a little boiling water – say a teaspoon or so – or indeed some more icing sugar: it depends on whether you need the icing to be runnier or thicker; or indeed it may be right as it is. It should be liquid enough to coat easily, but thick enough not to drip off.
Choose your cake stand or plate and cut out four strips of baking parchment to form a square outline on it (this stops the icing running on to the plate). Then sit one of the cakes, uppermost (ie slightly domed) side down.
Spoon about a third of the icing on to the centre of the cake half and spread with a knife or spatula until you cover the top of it evenly. Sit the other cake on top, normal way up, pressing gently to sandwich the two together.
Spoon another third of the icing on to the top of the cake and spread it in a swirly, textured way (though you can go for a smooth finish if you prefer, and have the patience). Spread the sides of the cake with the remaining icing and leave a few minutes till set, then carefully pull away the paper strips.
I love to dot the top of this with sugar pansies – and you must admit, they do look enchanting – but there really is no need to make a shopping expedition out of it. Anything, or indeed nothing, will do.
And so ends your dinner party and there is the mess to contend with. And what a mess dinner parties create!

What would we do without our humble dishwasher to help clean up? Can you imagine washing all those dishes by hand? It only takes 9 minutes to load and unload 12 place settings in a dishwasher, while it takes 60 minutes to wash this by hand.
This means that a family of 4 could save up to 4 hours each week simply by using a dishwasher! Not to mention how many times you would have to change the dishwater in the sink because it gets dirty so quickly.
This germ phobe would much prefer the dishwasher to wash the dishes at a high temperature and end up with sparkling clean dishes. The effective detergents from Finish contain far more active ingredients than washing up liquid, ensuring food soils are broken down and washed away during the washing cycle to leave behind nothing but shine.
Thanks to rinse aid and latent heat on the dishes, tableware washed in the dishwasher come out with a wonderful shine and free from the spot marks and streaks you can see after washing up at the sink.
Finish is the only dishwashing brand to be tested and recommended by leading dishwasher manufacturers. Use Finish Quantum for an amazing shine and clean. Together with a strong dishwashing detergent like Finish, it’s the hygienic way to help protect your family from germs and bacteria that can build up on sponges, dish cloths and tea towels. Yuk!
Not to mention, you save money using a dishwasher. It has been proven that dishwashers can use less water and energy than washing the same load by hand. With utility prices rocketing in recent years, these savings can actually lower your utility bills!

With houses and families getting smaller, you need something small and compact in the kitchen. The new series of Fisher & Paykel dishdrawers look fantastic but can take the place of a drawer in the kitchen, which means more storage space. The dishdrawer range comes in 12 different models and can fit any size kitchen or usage requirements, Single or Tall (both genuine half loads), Double or extra wide… it is up to you.
With the dishdrawer, there’s finally a range of dishwashers that can literally be placed anywhere, in even the tightest of kitchens or for the smallest of families. It’s the ultimate in convenience; space is no longer an issue.
For more information regarding Fisher & Paykel dishwasher and dishdrawers please go to: http://www.fisherpaykel.com/au/kitchen/dishwashing/
For more information regarding dishwashers and how to use them efficiently please go to: http://www.dishwashingexpert.com.au/


